
USE A SANDBOX TO AVOID COSTLY MISTAKES
Did you ever have one of those moments where you wished that your life had an “Undo” button? Of course you did! Maybe it was when you did something stupid, or when you crumpled a fender trying to squeeze into a parking place. Clients often assume that Salesforce has one too, and they blunder ahead without fear. The bad news is that Salesforce does NOT have an Undo button. Why not? As an online platform, it really can’t: once a command is sent to the server in Seattle or Atlanta or Kuala Lumpur, one cannot retrieve it.
However, Salesforce does have something that’s just as good as an Undo button: it’s called a Sandbox. A Sandbox allows you to test out changes to your Salesforce without affecting your data. Once you get the Sandbox working, you can reproduce it in your organization’s Salesforce account (called Production) and Voila! You’ve created your own Salesforce Undo button.
Types of Sandboxes
When you create a Salesforce account, your organization automatically receives a certain number of Sandboxes. If you have created a Salesforce instance recently, you will be able to set up the following four types of Sandboxes as part of your instance (three of which are free of charge):
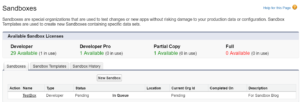
- Developer (30 available): This type of Sandbox is adequate for most purposes. It is an empty version of your Production Salesforce; it contains all the objects and fields but none of the data.
- Developer Pro (1 available): Developer Pro includes customizations like dashboards and report types that you have created in Production, which is not included in Developer. This is only necessary if the changes you are testing involve these functions.
- Partial Copy (1 available): This is a new and very useful type of Sandbox. It has the same structure as Developer Pro but it includes hundreds of your actual records. This is helpful when you are testing a procedure that has consequences for your entire Salesforce instance, such as upgrading to NPSP 3.0.
- Full Copy (0 available): You must purchase this from Salesforce directly. It is a complete copy of your Salesforce instance, including all objects, fields and data. There are certainly a few situations where this would be ideal. The cost has risen recently to over $500.
Creating a Sandbox
To create a Sandbox, follow these steps:
- Click Setup
- In the Setup Lookup field, type “Sandbox” and click the Sandbox link

- Click New Sandbox
- Give the Sandbox a Name (do not use spaces)
- Description is optional
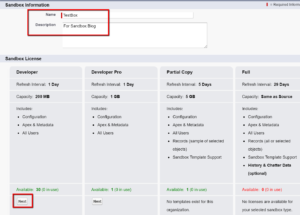
- Click Next under the type of Sandbox you want
- Leave the Apex Class blank
[Under very limited circumstances, mainly just for programmers, would you want to run an apex class after activation. This would likely only be relevant in a Partial or Full Sandbox where you had sensitive data and you did not want the actual text of client notes, for example, to appear in the Sandbox.]

- Click Create
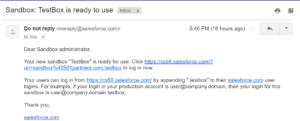
- Salesforce will notify you by email when the Sandbox is ready
NOTE: You can also see that the Sandbox is available by going to Setup >> Sandboxes
![]()
Sandbox Limitations
Here are some pro tips for using Sandboxes, as well as a few important limitations to keep in mind:
- Developer Sandboxes are intended to hold only a fraction of the amount of data that your Production Salesforce holds. Furthermore, you must populate Sandboxes separately with data using a data loader tool (see below).
- Include data that is representative but not exhaustive of the data in your Production instance because Sandboxes has limited storage. Sandboxes will not notify you when storage limits are reached: you will simply be unable to save new data. You can check your storage limits from within the Sandbox in Setup >> Storage.
- Not everyone can create a Sandbox. If you have profiles for various users at your organization, it is likely that only the System Administrator can create the Sandbox. However, most users can read and edit the Sandbox if they are given the credentials.
- When you create a new Sandbox it will not be immediately available. Developer Sandboxes typically take up to a day to create, although if you have a lot of custom objects and custom fields it may take several days. A full Sandbox can take up to a month depending on the amount of data to be copied and transferred.
- Note that the Sandbox has a different Organization ID than the Production account (the Org ID begins with “00D”). This may be important if you use a procedure that hard codes the ID.
- If you are testing a connection between your Sandbox and a mass mailing tool, keep in mind that if the Sandbox includes real email addresses, you may run the risk of accidentally sending messages to people as you do your testing. To avoid this, be sure to edit all email addresses in the Sandbox to go to yourself or colleagues and not the original recipient.
Logging into Your Sandbox
Once your Sandbox has been created, you will open it similarly to how one opens the Production account. However, there are several important differences:
- Once your Sandbox has been created, you can open it in a way that is similar to opening your Production account. However, there are several important differences.
- Let’s say your Production account is sandbox@wp501partners.wpengine.com and the name of theSandbox is TestBox. You would sign in as follows:
- In your browser, type in https://test.salesforce.com[1]
- For the login type sandbox@wp501partners.wpengine.com.TestBox
- Use the same password as your Production account

[1] Alternately, log in from the URL link you received in the email from Salesforce. In the example above, it was https://cs59.salesforce.com
Adding Data to Your Sandbox with a Data Loader
A Developer Sandbox has the structure of your Production account, but no data. You want the data in the Sandbox to be as representative of your Production account as possible. You can load real data from your Production account (keeping in mind that if the Sandbox includes real email addresses, you may run the risk of accidentally sending messages to people as you do your testing (the caveat about real email addresses). You could also download fake data from the Internet.
Add data that is relevant for the project you are doing with the Sandbox. I would recommend adding at least the “Contact” and “Account” data at the minimum. If you are experimenting with other objects, including any custom objects, add data for those and link them as appropriate to the “Contacts” and “Accounts.”
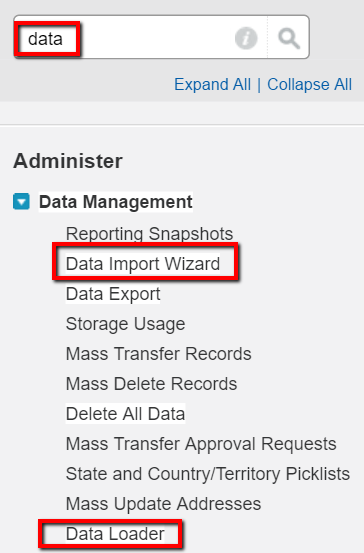
There are several tools that you can use to add data to a Sandbox. These include two that are built into Salesforce: Data Wizard and Data Loader. Both can be found under Setup. However, the Data Loader is a piece of software that must be installed on your local computer before you can use it.
An additional option is an online tool called dataloader.io that you open from your browser. This tool has a more user-friendly interface than the native Salesforce tools, but it has a limit of 10,000 records a month. While this is not an issue for creating a Sandbox, it is something to consider when doing a large migration.
Transferring Processes from a Sandbox to Production
Once you have completed a project in the Sandbox you will need to transfer the changes to the Production account. Unfortunately you cannot simply copy and paste; you will have to go to Production and repeat the steps you took in the Sandbox. In other words, TAKE GOOD NOTES, since you’ll have to must go through the whole thing again. However iIt should be easier in Production since you have figured out all the knotty problems ahead of time.
Refreshing a Sandbox
Once you have created a Sandbox, you can use it again and again for multiple projects. However, if there have been considerable changes in your Production instance since you created the Sandbox, you may want to refresh it before using it again. By refreshing your Sandbox, you update it to the structure of your current instance without using up another Sandbox. This is especially important in the case of a Pro, Partial or Full Sandbox, which offers you only one license. Refreshing it also allows you to continue using the same practice data that you have already previously loaded.
Follow these steps to Refresh a Sandbox:
- Under Setup >> Sandboxes select the Sandbox you want to refresh
- Click “Refresh”
- Wait until Salesforce notifies you that the Refresh is completed. As with creating a Sandbox, this could be several days
- When the Refresh is complete, click “Activate” to use the refreshed Sandbox

Deleting a Sandbox
If you wish, you can delete a Sandbox by the same procedure as Refreshing it. Deleting a Sandbox will restore the number of Sandboxes you have available to you.
Final Notes
Anytime you are contemplating a major change in your Production instance, I recommend testing it first in the Sandbox to identify any unanticipated consequences. However, best practice also dictates that even when you have successfully accomplished your project in a Sandbox, you should back up your Production account with Setup >> Data Export before making the changes there. That way if anything unexpected crops up as you implement the changes—you can always return the Production account to its previous state. It’s like having two undo buttons at your disposal!
So grab your pail and shovel! I’ll see you at the Sandbox!
