This post is for anyone already using Person Accounts.
![]() There are pros and cons to using Person Accounts, but because relatively few apps play nicely with them, they’re typically used by organizations that have a good reason for going the Person Account route. So don’t think that you need to go switch today – if you don’t use them, you’re off the hook today! Jeff Douglas’s blog has a fantastic, detailed description of Person Accounts if you want to learn more about this account type.
There are pros and cons to using Person Accounts, but because relatively few apps play nicely with them, they’re typically used by organizations that have a good reason for going the Person Account route. So don’t think that you need to go switch today – if you don’t use them, you’re off the hook today! Jeff Douglas’s blog has a fantastic, detailed description of Person Accounts if you want to learn more about this account type.
The problems and constraints: a client had begun using Salesforce with both Person Accounts and stand-alone Contacts not tied to any particular Business account. Effectively, they had two different ways of managing individual people, with thousands of records of both types.
- Eventually, as their business processes evolved and solidified, they realised they wanted to standardize on using Person Accounts.
- They had far too many Contacts to convert by hand.
- Each Contact had related objects – payments, event attendance records, opportunities, etc. These related objects could not be lost, so simply importing contact data into a new Person Record wouldn’t actually work effectively.
The solution: is a multi-step solution using some spreadsheets and Data Loader (or any other tool, like Jitterbit, that will give you a success file with newly-created record IDs, so you don’t have to manually match up spreadsheets). Hours of searching turned up exactly nothing on the step-by-step front, though Salesforce does detail what the rules are to enable a conversion, so we decided to put our solution out there in case it helps someone else. Converting Contacts to Person Accounts is Admin Ninja Level: beginner.
Part 1: Preparation and Pre-Reqs (4 steps)
1. Make sure you have a recent backup or data export!
2. You will need to know the Account Record Type ID for both your Person and Business Account record types.
You could create a query against the Record Types object for this, but we find it’s just faster to copy/paste the ID from the URL.
- Log into Salesforce as an administrator.
- Go to Setup->Customize->Accounts->Record Types. Click on the name of the record type (it will usually be called something like Organization or Business).
- Look in the URL for ?id= and copy the unique ID. Save this ID for later, and make absolutely sure you know that this is your business record type.
- Go to Setup->Customize->Accounts->Person Accounts->Record Types. Click the name of the record type (it will usually be called something like Individual).
- Look in the URL for ?id= and copy the unique ID that follows. Save this ID for later, and make absolutely sure you know that this is your person account record type.
![]()
3. You will also need a file that contains the existing Contacts that you want to convert to Person Accounts.
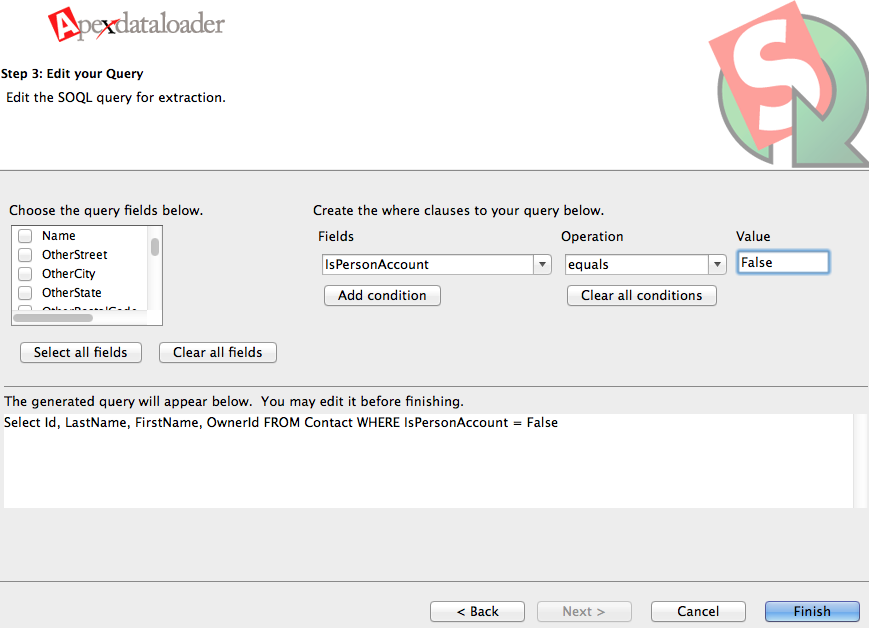
View full sized image to see the DataLoader query for steps 3 & 4.
- Use Data Loader, Jitterbit, the Workbench, or any other tool that will let you create a query and export it to a CSV file. We use LexiLoader in these screenshots. Note that you can also use a custom report type, or anything that will let you get to the OwnerID (not the owner name).
- Create a query (or export) on your Contacts object.
- Your query should contain the fields: ID, First Name, Last Name, and OwnerID.
- Your report should be filtered so that field IsPersonAccount equals False. (You only want contacts that are not attached to a person account. Alternately, you can get contacts whose Account field is empty, which will exclude all of your Business contacts as well as already-converted Person accounts).
- Run your query and save the results as a CSV (comma separated values) file.
4. Use your favorite spreadsheet editor to open the CSV file from Preparation step 2.5.
- Change the heading for ID to ContactID.
- Add 3 new columns: Name, Business Record Type, and Person Record Type.
- Paste the business record type ID (from Preparation step 1.3) into the appropriate column for every row in your spreadsheet. Paste the Person Record Type (from Preparation step 1.5) into the appropriate column for every row in your spreadsheet.
- Populate the Name formula by concatenating First and Last name (in Excel the formula is =C2&” “&D2 where C2 is your first name column and D2 is your lastname column). After you have copied this formula to all rows in your spreadsheet, copy the whole row and paste it back as values only. This will ensure that your CSV saves the actual text of the name, and not the formula!
- Save your spreadsheet as a CSV. We called ours Final-step1.csv and you can download it as an example.
Part 2: Implementation (3 steps)
1. Create new BUSINESS Accounts using the Name column in your spreadsheet

Click on the image to see the full view of an example data mapping for step 1.
- Open Data Loader and choose Insert
- Choose Account as the object to insert into (note, your organization might have re-labeled Account as Person Record or similar)
- You will not map all fields from your spreadsheet! Only map the fields from your spreadsheet as follows:
- Name->Name
- OwnerID->OwnerID
- Business Record ID -> RecordTypeID
- Make sure you save your success file into a place that you can edit it, it becomes important in steps 2 and 3.
- Insert your new accounts and open the success file in Excel once the uploads are complete.
- Open the Success File you created in the step above, using your favorite spreadsheet editor.
- Confirm that you have a new column called ID. This is your AccountID that was created in the step above.
- Spot-check a few of these IDs in Salesforce just to confirm that they correspond to the name you expect. It’s always a good idea to test several, just in case. Note, to spot-check, all you have to do is copy the ID from the spreadsheet, and paste it in your Salesforce URL immediately after salesforce.com/
- Save the spreadsheet as something you can find easily, and also easily differentiate from your original spreadsheet. We called ours Final-step2.csv.

2. Connect the Contact to its new Account: Update the AccountID on the Contact Records using your success file from step 1.

Click to view full screenshot example of the data mapping for step 2.
- Open Data Loader and choose Update.
- Choose Contact as the object to update.
- Use the spreadsheet you created above, that contains the new Account IDs (NOT the original spreadsheet!)
- You will not map all fields from your spreadsheet! Only map the fields as follows:
- ID->AccountId
- ContactID->Id
- Update your Contact records.
- You may want to spot check a few contacts to make sure that the contact record now shows an Account (or Person Record) and that the name on the Account matches the name on the Contact.
3. Convert the Business Accounts to Person Accounts

Click to view the full size screenshot of data mapping for step 3.
- Open Data Loader and choose Update
- Choose Account as the object to update.
- Use the spreadsheet you created in step 1, that contains the new Account IDs (NOT the original spreadsheet!)
- You will not map all fields from your spreadsheet! Only map the fields as follows:
- ID->Id
- PersonRecordID->RecordTypeId
- Update your Account records.
That’s it! You’re done! Your old contacts and all of their related lists have been converted to Person Accounts, preserving the related lists and all of your existing contact detail.
We hope you found this post helpful, please share it if you know someone who is struggling with this problem and let us know if you have an alternate or better solution for converting contacts to person accounts.
